
IMPLEMENTATION PLAN
| MONTH | TASK | DEADLINE? |
| February | Re-measure and photograph the plot | Early feb |
| Spend a few hours up at the allotment doing observations, sketching and planning the new layout | Early feb | |
| Sketch out a base map and play around with possible layouts of the main features | Early feb | |
| Get quotes for all building materials and decide where to source these from. | Early feb | |
| Buy building materials for fence/gate/play kitchen | Half term | |
| Take down the south wall of the existing fence and put up new one | Half term | |
| Put in the new gate and tower posts | Half term | |
| Put the new bolts on the gates | By sessions start | |
| Research mud kitchen ideas and re-do this feature | End feb | |
| Clear the movable objects from the newly enlarged space so I can see the layout more clearly | End feb | |
| March | Draw out my finalised plans | Early March |
| Tidy the shed and do a stock check. Make a list of any equip or materials I need to buy for this seasons activities. | Early march | |
| Begin saving tin cans for the allotment planters | Early march | |
| Move the sandpit | End march | |
| Buy more sand and fill it up | By session start | |
| Mark out the triangular bed | Early march | |
| Make the willow den | Mid march | |
| Cut the grass/ rake over to clear debris | Mid march | |
| Buy the marine ply board for the blackboard/ painting board/ spotted board/ welcome signs | End march | |
| Install the blackboard/ painting board etc and paint them in situ | End march | |
| Define the boundary of the strawberry bed and apple tree guild bed | End march | |
| Buy more plastic plates and another thermos flask | End march | |
| April | Drill holes into the tin can planters | Early april |
| Install the tin can planters and plant up with pansies | By session start | |
| Select, print and laminate some photos or pics of fruit/veg/flowers to decorate the picket fence. Put these up with staple gun. | By session start | |
| Mow lawns again | By session start | |
| Test out gazebos and decide which one to use | Early april | |
| Gather ground sheets, blankets etc | Early april | |
| Take home and wash and return all snack and drink utensils | By session start | |
| Buy washing up liquid, tea, coffee etc plus sponges, wash up equip | By session start | |
| Final checks before first session on April 15th | By session start |
CARRYING OUT THE IMPLEMENTATION
FEBRUARY
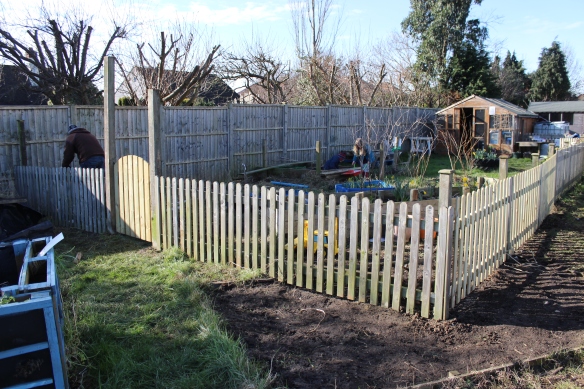
We spent three bright and cold days at the allotment over half term. We re-made the fence line and installed a new gate leading out into the wider community allotment.
Day 1 – moving the fence and beginning to re-install it. 

Day 2 – completing the fence and putting in the gate

Day 3. Moving the blue planters, moving a cherry tree, making the triangular corner bed and beginning work on the mud kitchen.
The P of CEAP is for Plan a schedule of implementation, maintenance, evaluation and tweaking.
But where is the actual design bit? This seems to come up a lot for me when using Permaculture design process systems. There is lots of detail about how to prepare for producing your design, but it never actually says “now draw your design” why is this?
So I have chosen to draw my design at this point in the design process. As at this point the space was more open and I could visualise the layout more clearly. I sketched out a rough plan for the new design while at the allotment and then worked more on the design at home.
So this is the design that I feel most happy with at the moment, but I am open to making more changes as the project rolls on and the space tells me what it needs. So I’ve kept the design loose, still using pieces of paper on the base map and not drawing it out in full yet.

UPDATE – Here is the final design drawn out and coloured in!

and a close up to show some of the details.


Brilliant planning, real interesting. Wishing you valuable times while doing this project and success.
Thank you so much! I appreciate you taking the time to comment xx